Sunday, September 29, 2019

Got orphan blocks? The Cat Clinic kitties will adopt them.

Another wonderful use for orphan quilt blocks and fabric crumbs is the making of charity quilts. My quilty donations go to the Cat Clinic of Chattanooga where these little quilts are used in the cubbies where the cats and kittens recover from surgeries and medical procedures. My kitty quilt pile grew to 6, so it was time again to visit the kitties!
Six kitty cuddle quilts ready for drop-off at the Cat Clinic of Chattanooga.

The finished size of the kitty quilts is approximately 25" x 27". They're small, manageable, quick and fun to make. In addition to comforting the cats, a quiltmaker can benefit by 
  • practicing free-motion quilting on them.
  • trying out new quilting techniques—such as ruler work or curved piecing.
  • practicing binding by machine.
  • testing decorative stitches or new quilting motifs.
  • and using orphan quilt blocks and scraps to create something useful and appreciated.

Charity quilts made with orphan quilt blocks and scraps.

I combine orphan blocks and various fabric bits to produce colorful patchwork menageries. Dr. Toumayan, the veterinarian and founder of the Cat Clinic, says both the kitties and the clinic's staff enjoy the bright colors and fun novelty prints! I usually put flannel on the backs of these quilts for an extra snuggle factor.

Flannel fabric is often used on the back.

Upon my arrival at the clinic, it didn't take long for Mooch, the current office cat waiting for his forever home, to check out the delivery.

I got to meet Mooch at the Cat Clinic.

Mooch is a sweet, friendly cat. He and his brother would make great additions to anyone's family! Oh, and he likes quilts.

Mooch inspects the new quilts.


Sunday, September 22, 2019

Orphan block Zippy Pouch: another Make Nine finish

This month, my guild, the Choo Choo Quilters, had a program about adopting and embracing orphan blocks and ideas for using them in projects. Orphan blocks—we all have them. They're tucked away in drawers, bags and boxes in the sewing room, they're the test blocks made before deciding to make a full quilt, the blocks from a class you took 5... 10... or 15 years ago, or maybe you rescued someone else's quilt blocks or vintage quilt top at a yard sale or e-Bay. Sadly, many of us have those lonesome misfits that never quite made it into a finished project.

One block Zippy Pouch made with an orphan quilt block.

As I have "collected" quite a number of miscellaneous quilt blocks and rescued and repurposed several abandoned quilt tops over the years, I offered to help with the program. While gathering my examples, this lonely block resurfaced. I decided to give the re-purposing process a go and make this orphan into a useful item—a zippered pouch. A zippered project bag also happens to be one of my Make Nine Challenge projects. Serendipity! I got twice the bang from this one block.

Repurposing an orphan block
The pattern I used was the Chunky Wee Zippy Pouch by Sam Hunter of Hunter's Design Studio. This is a great pattern as it not only has instructions for three sizes and shapes (see photo above), but provides a formula for making a custom size. (Visit your local quilt shop and ask for this pattern or support the indie pattern designer and purchase from her website.)

The size of my orphan block was 12.5" unfinished. Here is the quilted sandwich.
Quilted orphan block for zippered pouch.

The backing—which ends up being the inside of the pouch—was another random fabric bit from my stash.

Quilted block (inside). Examples of different free-motion fillers, a zigzag
and using rulers to stitch in the ditch can be seen.

A single fold binding was attached in preparation for sewing in the zipper.

Orphan block quilted, trimmed and ready for zipper insertion.

In addition to the orphan block, the materials used in the project were all scraps.

Finished zipper pouch.

Benefits of creating with orphan blocks 
As I worked through this project, I was reminded of several benefits to using these orphan UFOs [unfinished objects] in a project.
  • you get a jump-start to making a project. Part of the work is already done! (by you or by someone)
  • a small project offers an opportunity to practice free-motion quilting.
  • it offers an opportunity to experiment with different FMQ designs. Try a different motif in each section of the patchwork.
  • you can practice new quilting techniques: rulerwork, quilting in the ditch, walking-foot quilting, etc.
  • this project gave me practice with inserting a zipper.
  • a single orphan block can be combined with other orphan blocks, and/or combined with scraps from other projects.
  • If your orphan is a rescue, it's fun to collaborate with other (anonymous) quilters.
  • It's rewarding to recycle and give a new purpose and meaning to a languishing block or blocks.
Finished Zippy Pouch made from a single 12" quilt block.

It was fun to refashion an unused quilt block into something new and useful. Several guild members showed examples of pillows, tote bags, needle books, and the like that they created from orphan quilt blocks and fabric bits. Put on your thinking cap and you will be pleasantly surprised.


Sunday, September 15, 2019

The Cottage Shirt in Yalke blue—30 minutes at a time

These days, it's more and more difficult to find longer, continuous blocks of time to work on our needle arts projects. I was talking with a fellow garment sewer last week about the new Cottage Shirt I was wearing, and she agreed. She mentioned an upcoming quilting retreat she's attending and is eagerly anticipating some dedicated work time for her quilting projects. If you have a sporadic schedule like me—or have too many balls in the air simultaneously (and who doesn't?)—you'd be pleasantly surprised at what can be accomplished in short spurts of time if you keep focused. My new Cottage Shirt is an example.

The Cottage Shirt [by The Sewing Workshop] in Yalke [from M&S Textiles Australia].

For this garment, I've paired another lively, smart-looking Australian aboriginal fabric—Yalke [blue colorway], by M&S Textiles Australia—with the Cottage Shirt pattern from The Sewing Workshop. The Cottage Shirt is a new pattern for me. And even with my involvement in the 100 Days 100 Blocks project, the September Textile Love Challenge, and contributing to an upcoming quilt guild program about using orphan quilt blocks, this top took about 2 weeks to complete—sewing in blocks of time of 30 minutes to about an hour.

The Cottage Shirt in a 100% cotton fabric.

Here is a break down of the process, in manageable chunks.
  • pre-washing the fabrics can be done while doing other things.
  • read through the pattern a few times and familiarize yourself with it. This can be done while you're having morning tea/coffee or at lunchtime, etc. Reading through the pattern also gets you excited about working on the project!
  • Determine your size and trace the pattern pieces. 
Tracing the pattern pieces.
  • I did make a muslin to test the fit. Just a bodice muslin—no collar or sleeve cuffs were attached. I only made one modification to the armhole depth.
  • The pattern layout and cutting was easy. I was careful to match the pattern repeat across the side seams.
Pattern traced and pieces cut.

The sewing process can be accomplished in chunks of time: pre-pressing hems, finishing seams, attaching any interfacings, assembling collar stands and collars, etc. This pattern has minimal pieces (fronts, back, collar and stand, and sleeve cuffs), so there are not many seams or intricate piecing.

Cottage Shirt side vent.

Once I tried on the shirt in the fashion fabric (above), I decided a smaller side vent looked better on me. I just extended the stitching further down the side seam. While modifying the vent, I also decided to make the front/back lengths asymmetrical (photo below). This was an on-the-fly design detail decision. (My shirt, my rules!)

Cottage Shirt side vent modifications: smaller vent and asymmetrical hems.

The bottom hems are stitched down by machine which makes this finishing step quite quick. I hand stitched the sleeve band hems by hand as I enjoy the hand work.

The Cottage Shirt (front view).

Burying thead tails, making machine buttonholes and hand sewing the 5 buttons were the last few finishing steps.

Mid-September sunshine.
I accidentally took this photo, but when I saw it in my iPad photo feed,
I liked how the branches of the tree extended out from where I stood.

Our mid-September weather is surprisingly "in-the-90s hot" and still requires wearing short-sleeve tops. I wore this shirt last week on business calls and received several compliments. The Australian aboriginal prints are always great conversation starters!


Sunday, September 8, 2019

Another use for duck billed appliqué scissors

Has this ever happened to you?
A random fabric scrap inadvertently was quilted to the back of this quilt.

You finish free-motion quilting a quilt... flip it over, and... darn it! You've quilted a random fabric scrap to the back of the quilt! Geesh. Hate it when that happens...

Do you have appliqué scissors in your sewing tool box?
At a recent guild meeting, the program topic was Favorite Gadgets and Tools. Several members brought in their tried-and-true must-have tools, special rulers that made cutting and piecing more accurate, and tools and gadgets that made various assembly processes faster and easier. Several newer quilters sought advice, asking questions and the experienced quilters were quick to provide insight.

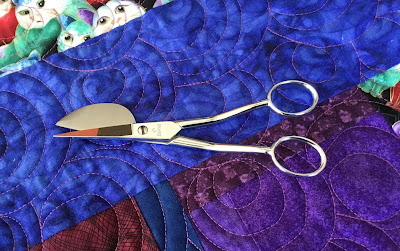
applique scissors
Duck billed applique scissors.

One of the questions was about those funny-looking scissors that had one fat and one narrow blade—appliqué scissors. Not long after this discussion, I found myself reaching for those duck billed scissors when I inadvertently quilted a fabric scrap to the back of a charity cuddle quilt.

Scrap removal
Inserting the duck billed blade between the scrap and the quilt back, I carefully snipped away the scrap—bit by bit—close to the quilting stitches. The larger blade lays flat against the backing to protect it from being cut. These scissors also have cutting ability right to their tip for tight places requiring small snips.

After enough of the fabric scrap is clipped away, just threads remain that can be pulled out from under the quilting stitches.

Fabric scrap clipped away using the applique scissors.

This quilt has a flannel backing fabric with cute kitty faces. Note that NO kitties or backing were harmed in the scrap removal process!

Scrap removed! No kitties or backing was harmed.

So, take a look in your quilting toolbox and get familiar with your tools. You may not use a few of them all the time, but when the situation arises, the correct tool is the best solution!

The finished cuddle quilt.
Finished kitty cuddle quilt.

Sunday, September 1, 2019

"September Textile Love" Challenge starts today

Welcome September! It's time again to celebrate textiles with the September Textile Love Challenge, hosted by Seam Collective. The Day 1 Introductions are beginning to stream on Instagram.
My Day 1 Intro to #SeptTextileLove challenge is posted on Instagram
at veronica.fiberantics. I'm standing in front of my design wall with
#100days100blocks progress.

I participated in this Challenge last year and was introduced to many textile and fiber artist as well as being very inspired by what was posted. Daily prompts encourage textile artists, makers, students and anyone with a love for textiles to share a picture in response to the prompt. The 2019 prompts are listed here and there is also a worksheet for download.

#septtextilelove
September Textile Love Challenge for 2019 begins.

People's interpretations to the prompts can be enlightening, inspiring, fun and thought-provoking. This year, the folks at Seam Collective have included prompts that touch on the idea of sustainability and sustainable practices. It should be a very intriguing September!


Related Posts Plugin for WordPress, Blogger...